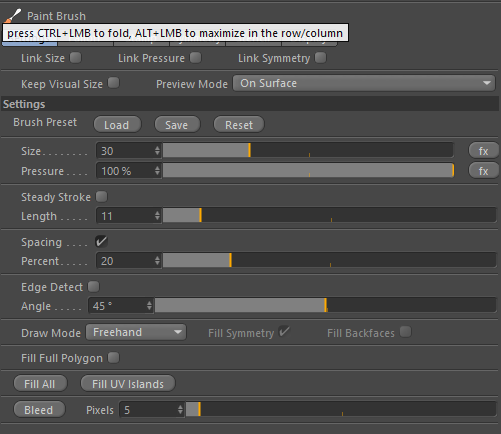
4D Paint | Painting | Paint Brush | Paint Brush Features

Used to save and load brushes with all the settings for the brush.
The Size of the Brush Dab
The pressure of the brush. Less pressure will apply less paint.
When enabled it will allow you to create smoother strokes by having the painting lag slightly behind the brush cursor. This helps avoid shaky lines being drawn.
Adjust to set the distance the brush should lag behind when doing a steady stroke.
The distance between brush dabs.
This is actually a percentage of the brush size itself. The default is 20, meaning the brush will move 20% of the size of the brush before drawing another dab. This will result in the brushes overlapping by 80%. This default value of 20 gives a nice uniform brush stroke.
A value of 100 will mean it will go the full distance of the brushes size before drawing a dab, so in this case you will not see any overlapping dabs on the surface.
To speed up painting you can increase the stamp spacing so that it doesn’t draw as many dabs on the surface as you paint. This is perfectly acceptable for all the current brush algorithms available in this brush.
The percentage of the brush size to move before placing another paint dab onto the surface.
This can be used to fill parts of the surface based on its curvature. If you enable this option and click on a flat part of a model it will fill all the polygons until it hits a curved part of the model.
You can adjust the angle of detection using the Angle slider.
Specify the angle of curvature that the brush should stop drawing.
These are the modes that you can use to apply paint to the surface. The main brush is the FreeHand brush. You can also draw lines and use fill tools as well.
This is the main brush. Think of this as a normal paint brush.
Click anywhere in the viewport to mark points on a line. When you are finished defining the line you can either double click, or right mouse click, to draw the line. Pressing the ESC key will abort the line drawing.
There are 3 fill tools. These all need to overlap points on the mesh to work. If the selected area does not include any points on the polygons you intend to fill, then no paint will applied. Please read the rest of this document to find out more about this limitation and also how to work around it by subdividing your model.
Draw a lasso selection on the model that you wish to fill.
Draw a polygon, defined by straight lines, that you wish to fill.
Drag out a rectangular shape that you wish to fill.
When using any of the fill tools you can choose to enable symmetry. If this option is enabled, and you have some symmetry setup, then it will fill the symmetrical areas as well. Disabling this option will only apply paint to the area defined by the fill shape that you have drawn.
When enabled it will also apply any paint to any backfacing polygons. This is useful if you wish to project paint onto the entire model by doing a rectangle select over everything. With this option enabled it will then apply paint to all the polygons.
When enabled it will fill any polygons completely with the color, or stencil, that you have setup. This enables a very fast workflow for blocking out parts of the model. This method is much faster than regular painting since it does not need to take into account the radius of the brush, and can just flood fill any polygon that the brush touches.
This will flood fill all the polygons on the model. If you have a current selection then it will only flood fill the selected polygons.
This is a handy utility to simply flood fill all the UV Islands on the model with a random color. This allows you to visualize the various UV spaces on your object before you start painting.
Use the bleed options to extend out the pixels from the UV boundaries. This will eliminate any seams that you might have on your model.