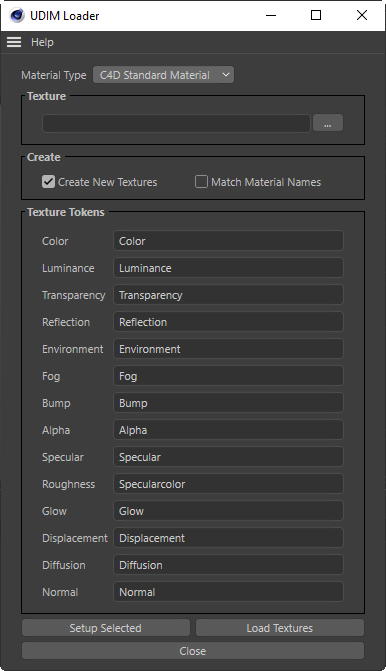

If you import an object that already has its UVs setup for UDIMS, such as uvs going from 0-1, 1-2, 2-3 etc... then you can use this dialog setup materials for each of the UDIMS and load in all the correct textures for each UDIM based on the file naming convention.
To load in the images for each UDIM you simply select a single texture from disk in a folder that contains all the textures for this object. The texture must have the UDIM number as part of its filename. It must also have the name of the channel which the texture should be assigned to in C4D.
As an example, a file with this filename "Model_1006_color.tif" will be loaded into the color channel UDIM 1006.
Then any other images in that same folder that will also be loaded onto other UDIM materials in their appropriately named channels.
The UDIM Importer can create materials for your specific renderer. Note that for some renderers/materials only a subset of the channels is supported. This will be indicated by greying out the Texture Tokens.
Will create Cinema 4D Standard materials.
Will create Corono Renderer materials.
Will created Redshift materials.
The first filename of a udim in the folder where all the image are located.
If enabled, and there is no filename specified, then it will create a new image in the color channel for every UDIM found on the model.
This option can be enabled if the material name is expected to be part of the texture name.
It will also retain the existing material names that came with the file, rather than generate new names. The names of the new materials in C4D will be changed to include a MaterilaName_UDIM_XXXX at the end of the name, where XXXX is the UDIM number.
The texture names will be expected will be something such as materialname_1000_diffuse.tiff. IE it needs to include the material name, the texture token and the UDIM number.
These allow you to change the name of the tokens to look for in the filename so that you can map them to a different channel on your material.
Note: These are case sensitive.
Will create all the UDIM materials on the object. It will create a material and selection tag per UDIM and then assign all the textures found in the directory specified by the sample texture, to their appropriate channels. If no texture was specified and "Create New Textures" is enabled then it will create a new blank texture for the color channel.
If you already have UDIM materials on your model but you have a second list of textures for different channels then you can use this button to just assign all the channels in the specified directory to the already existing UDIM materials on the object.
Close the dialog without doing anything.